
How to Build a Primitive Fish Trap: Weir, Funnel, and Bottle Designs for Survival Fishing
In a true survival scenario, every calorie counts, and every moment spent on a task must yield maximum return. While a rod and reel might be your go-to for a leisurely afternoon of angling, when your life depends on it, passive fishing methods become invaluable. Knowing how to make a fish trap is a fundamental skill that can provide a consistent, low-effort protein source, freeing you to focus on other critical survival tasks like shelter building, water purification, or signaling for rescue. This comprehensive guide will walk you through constructing three distinct types of primitive fish traps: the robust stick-and-stone weir, the versatile woven funnel basket, and the ingenious plastic bottle trap, equipping you with the knowledge to secure food when it matters most.
Related TacticalProof reading: The 10-Item Minimalist Bushcraft Kit: What to Carry When You Want to Carry Almost Nothing | 9 Primitive Cooking Methods Without Pots or Pans: Bushcraft Techniques for Survival
Why Passive Fishing Beats Rod-and-Reel in a Survival Situation
In a survival scenario, active fishing demands precious energy and constant attention. Passive fishing methods, conversely, offer a strategic advantage by working for you around the clock with minimal oversight. This efficiency is paramount when every calorie and minute are critical.
- Energy Conservation: Building and setting a trap requires an initial effort, but once in place, it operates autonomously. This frees you to dedicate energy to other vital tasks like shelter, water, or fire.
- Multi-Tasking Capability: With traps working in the background, you effectively multiply your efforts. You can be foraging, setting snares, or maintaining camp while your traps are catching fish.
- Consistent Protein Source: A properly constructed and strategically placed trap can yield a more consistent catch than sporadic active fishing, providing a steady supply of vital protein and fats.
- Stealth and Safety: Traps, especially those made from natural materials, can be camouflaged and checked discreetly, reducing your footprint and maintaining a lower profile.
- Adaptability: Primitive fish traps can be adapted to various aquatic environments and constructed from a wide array of natural or improvised materials, making them a universal survival skill.
Mastering these techniques isn’t just about catching fish; it’s about understanding the environment, conserving resources, and maximizing your chances of survival. Let’s dive into the practical construction methods.
How to Build a Stick-and-Stone Fish Weir in a Stream
The fish weir is one of the oldest and most effective primitive fish trap designs, utilized by indigenous cultures worldwide for millennia. It’s essentially a barrier constructed across a stream or river that funnels fish into a collection area, particularly effective for migratory fish or those moving between feeding and spawning grounds.
1. Site Selection: The Foundation of Success
Choosing the right location is critical for a successful fish weir. Look for:
- Shallow, Flowing Water: Ideal depth is typically knee to waist-deep, allowing for easier construction and effective channeling.
- Natural Choke Points: Narrow sections, areas between large rocks, or bends in the river reduce material needs and leverage natural topography.
- Moderate Current: A steady, moderate flow is best; too strong makes construction difficult, too weak may not guide fish effectively.
- Abundant Materials: Ensure plenty of rocks, sturdy sticks, and perhaps some mud or clay nearby for sealing.
2. Gathering Materials
You’ll need:
- Sturdy Sticks/Small Logs: 1-3 inches in diameter, long enough to span water depth plus enough to be driven into the streambed. Hardwoods like oak or strong saplings are preferred.
- Rocks/Stones: Various sizes for anchoring and building walls.
- Optional: Mud, Clay, or Sod: To help seal gaps between rocks and sticks, increasing efficiency.
- Tools: A sturdy stick or heavy rock for driving stakes.
3. Construction Steps: The V-Shape Weir
The most common and effective design is the V-shape, with the point of the ‘V’ facing downstream, where your collection area will be.
- Establish the Baseline: Drive stout sticks into the streambed from one bank to the other, forming the two arms of your ‘V’. Angle them slightly upstream for stability. Space them closely (e.g., 4-6 inches apart) to prevent fish from swimming through.
- Reinforce with Rocks: Pile rocks around the base of each stick for stability and to create a solid barrier. Fill gaps with smaller stones, gravel, or mud/clay.
- Build the Walls: Continue building up the walls of the ‘V’ using more sticks and rocks. The height should be just above water level to prevent fish from swimming over. Ensure the structure is robust against the current.
- Form the Funnel: The two arms of the ‘V’ should converge to a narrow opening (6-12 inches) at the downstream point, funneling fish.
- Create the Collection Area: Just beyond the ‘V’ opening, construct a small, enclosed collection area. This can be a woven basket, a rock-and-stick enclosure, or a deepened natural depression. Fish should easily enter but find it difficult to exit. Ensure it’s deep enough to keep fish alive.
- Check for Leaks and Reinforce: Observe the weir for gaps where water (and fish) can escape. Fill these with smaller stones, gravel, mud, or packed leaves/grass for maximum effectiveness.
Safety Warning: When working in moving water, be mindful of slippery footing. If the current is strong, proceed with extreme caution. Never build a weir that completely blocks a major waterway, as this can have significant ecological impacts and may be illegal.
Maintenance: Check your weir daily. Remove debris that accumulates and harvest your catch regularly to prevent spoilage and keep the trap clear.

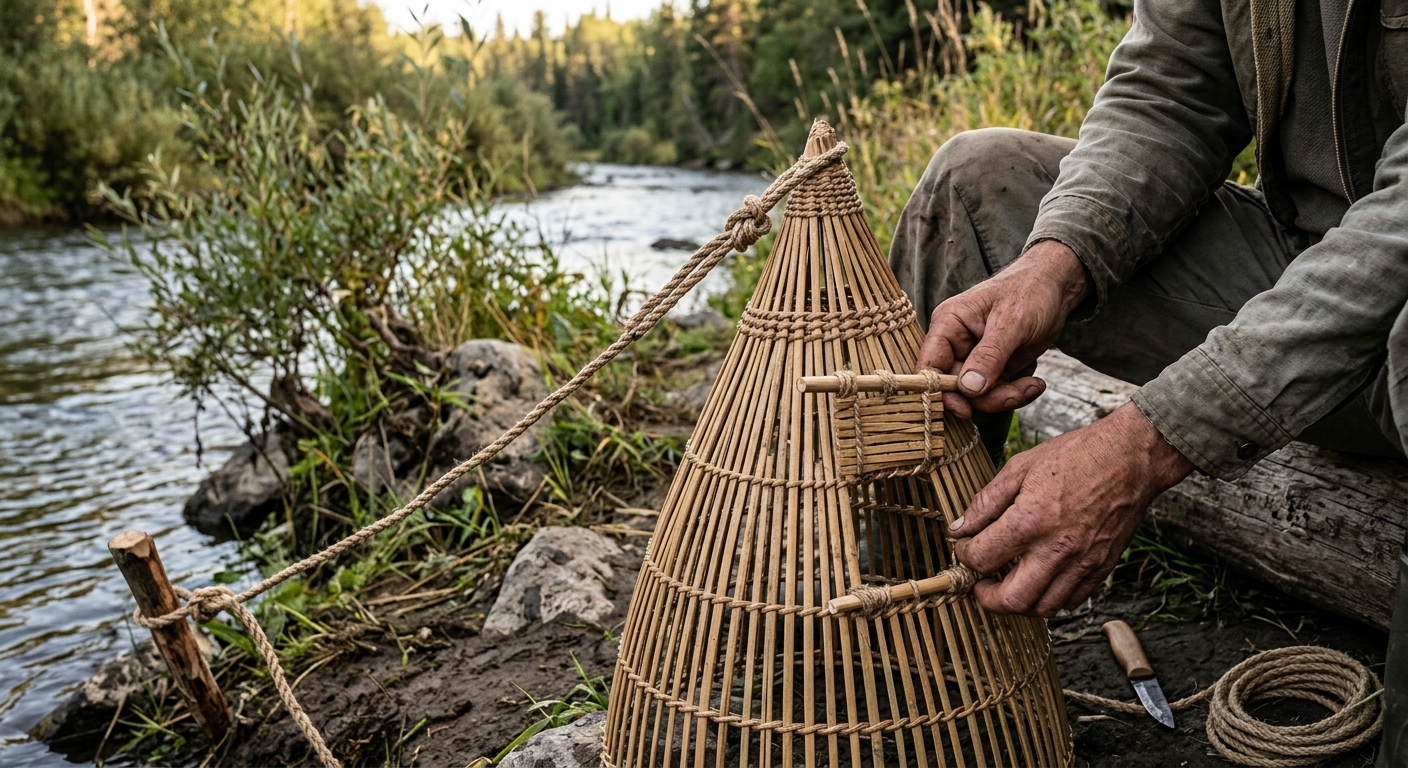
Weaving a Primitive Funnel Basket Trap From Saplings and Vines
A woven basket trap is a highly effective and portable primitive fish trap that can be deployed in various water bodies. Its design relies on a one-way funnel entrance, allowing fish to swim in but making it difficult for them to find their way out. This method requires a bit more skill and time than a weir but offers greater flexibility in placement.
1. Material Selection and Preparation
The quality of your materials directly impacts the trap’s durability and effectiveness.
- Flexible Saplings (Ribs): Look for straight, flexible saplings or branches, about 1/4 to 1/2 inch in diameter. Willow, hazel, or dogwood are good choices. You’ll need about 10-15 pieces, each 3-5 feet long.
- Weaving Material (Weavers): Thinner, more flexible material like smaller diameter saplings, split inner bark (cedar, basswood), strong vines (grapevine, honeysuckle), or tough roots. You’ll need a substantial amount.
- Cordage (Optional): Natural cordage (e.g., twisted inner bark fibers) can be used for binding.
- Tools: A sharp stone, shell, or knife for cutting and splitting.
Tip: Soaking saplings and weavers in water for a few hours (or overnight) makes them much more pliable and easier to work with, reducing breakage.
2. Constructing the Outer Basket Frame
- Create the Base Ring: Bend a long, flexible sapling into a sturdy ring, overlapping and lashing the ends. This will be the trap’s mouth.
- Insert the Ribs: Sharpen one end of your remaining saplings (ribs) and drive them into the ground in a circle, slightly larger than your base ring. Bend the top ends inwards to form a dome or teardrop shape.
- Attach Ribs to Base Ring: Position the base ring around the ribs (6-12 inches from the ground) and lash each rib securely to it, ensuring even spacing.
- Form the Dome/Point: Gather and bind the top ends of all ribs tightly at the apex, creating the closed end of your trap’s skeletal structure.
3. Weaving the Basket Body
Weave the flexible weavers through the ribs to create the solid body of the trap.
- Start Weaving: Begin weaving from the base ring upwards. Tuck one end of a long weaver into a rib lashing, then weave it over and under successive ribs, spiraling upwards.
- Tighten the Weave: Push each row down firmly against the previous one to create a tight, fish-proof barrier. If weavers are short, tuck the end and start a new one.
- Continue to the Apex: Continue weaving until you reach the apex where the ribs are bound. A tighter, more consistent weave increases effectiveness.
4. Crafting the Inner Funnel
This critical component creates the one-way entrance.
- Select Funnel Ribs: Choose 4-6 thinner, flexible saplings, about 1-2 feet long.
- Form the Cone: Bind one end of these saplings together. Spread the other ends out to form an inverted cone shape.
- Weave the Funnel: Use thinner weavers to create a cone that tapers to a narrow opening (1-3 inches) at the bound end. The wider end of the cone should fit inside the trap’s mouth.
- Insert and Secure: Insert the wide end of the funnel into the main basket’s mouth, with the narrow opening pointing inwards. Secure the funnel to the main basket’s base ring with lashing, ensuring no gaps.
5. Adding a Bait Door and Retrieval Cord
- Bait Door: Create a small, hinged door on the side of the trap, near the apex, for inserting bait and removing fish. Cut a few weavers and ribs, leaving one side attached as a hinge, and secure it with a simple toggle or tie-off.
- Retrieval Cord: Attach a long, strong piece of cordage to the apex of the trap to retrieve it from deeper water or secure it to an anchor.
Tip: For added durability and camouflage, rub mud or clay into the weave, or cover with local vegetation.
The 5-Minute Plastic Bottle Fish Trap for Quick Protein
When time is of the essence, or natural materials are scarce, a plastic bottle can be transformed into a surprisingly effective and quick-to-deploy fish trap. This DIY fish trap is a fantastic example of improvisation and resourcefulness for quick protein.
1. Materials Needed
- Large Plastic Bottle: A 2-liter soda bottle is ideal; water bottles work for smaller fish.
- Sharp Tool: A knife, razor blade, sharp rock, or heated piece of metal for cutting.
- Cordage: String, fishing line, shoelaces, or plastic bag strips for securing and retrieval.
- Bait: Whatever is available (see bait section below).
2. Construction Steps: Fast and Effective
- Prepare the Bottle: Remove labels and rinse thoroughly.
- Cut the Bottle: Carefully cut the top section of the bottle off, just below where the shoulder begins to curve inwards. You’ll have a larger bottom section and a smaller top section (neck and cap).
- Invert the Top: Remove the bottle cap. Invert the top section and place it inside the larger bottom section, so the bottle neck points inwards, creating a funnel.
- Secure the Funnel: Prevent the inverted top from separating. Punch or melt 3-4 small holes around the rim of the inverted funnel and corresponding holes on the bottom section. Thread cordage through these holes and tie securely. (If available, staples or strong waterproof tape can also be used.)
- Add Bait: Place your chosen bait inside the trap, at the very bottom.
- Attach Retrieval Cord: Punch or melt another hole near the top edge of the assembled trap. Thread a long piece of cordage through and tie it securely. This cord is for lowering, retrieving, and anchoring the trap.
Safety Warning: Cutting plastic can be tricky and sharp edges can cause injury. Always cut away from your body. If melting holes, do so in a well-ventilated area and avoid inhaling fumes.
Deployment: Lower the trap into the water, ensuring it’s fully submerged and resting on the bottom. Anchor the retrieval cord to a secure bankside object or submerged log. Check your trap frequently, ideally every few hours, to harvest your catch and refresh bait.
Bait Selection, Placement Strategy, and Legal Considerations
Building a trap is only half the battle; knowing how to bait it effectively and where to place it are equally important for maximizing your catch. Furthermore, understanding the legal implications of trapping is crucial, even in a survival context.
1. Effective Bait Selection
Fish are attracted by scent, sight, and sometimes sound. The best bait is often what’s naturally available in the environment.
- Worms and Insects: Earthworms, grubs, crickets, grasshoppers, and larvae are universally appealing. Dig for them in damp soil or under logs.
- Small Fish/Fish Guts: If you catch a small fish, cut it into pieces or use its entrails. The scent of distressed or dead fish is a powerful attractant for larger predatory fish.
- Berries and Fruits: In areas where fish feed on fallen berries or fruits (e.g., mulberries), these can be excellent bait. Crush them slightly to release scent.
- Crushed Plants: Some strong-smelling aquatic plants, when crushed, can release oils that attract certain fish species.
- Shiny Objects: Small pieces of aluminum foil or bright plastic can sometimes attract curious fish in clear water.
Tip: Place bait inside a small, porous bag (like cloth or mesh) within the trap. This allows scent to disperse without fish eating the bait directly, keeping them interested and searching within the trap.
2. Strategic Placement for Maximum Catch
Where you place your trap is often more important than the trap itself.
- Near Cover: Fish feel safe and often feed near submerged logs, rock piles, weed beds, overhanging banks, or dense aquatic vegetation.
- Drop-Offs and Ledges: Areas where bottom depth changes abruptly are often highways for fish moving between shallow feeding grounds and deeper, safer waters.
- Current Breaks: In streams and rivers, fish often congregate in calmer water downstream of obstacles or in eddies, where they can rest and ambush food.
- Shaded Areas: During hot days, fish often seek cooler, shaded areas.
- Migration Routes: If you observe fish moving in a particular pattern, place your weir or traps along these routes.
- Multiple Traps: Don’t rely on just one. Set several in different locations and depths to increase your chances and identify productive spots.
Observation is Key: Spend time observing the water before placing your traps. Look for signs of fish activity: ripples, jumping fish, or areas where insects are abundant.
3. Legal and Ethical Considerations
It is paramount to understand that in most developed countries, building and deploying primitive fish traps (weirs, basket traps, even bottle traps) is illegal without specific permits, even on private land. Fishing regulations are in place to manage fish populations and prevent overfishing or ecological damage.
- Survival vs. Sport: The techniques described here are strictly for genuine, life-threatening survival situations where conventional fishing methods are impossible or impractical, and your life depends on securing food. They are not for recreational use or casual foraging.
- Check Local Laws: In a non-survival context, always consult your local fish and wildlife regulations before attempting any fishing activity. Penalties for illegal trapping can be severe.
- Environmental Impact: Primitive weirs, if not properly constructed and removed, can alter stream flow, impede fish migration, and damage aquatic habitats. In a survival situation, your priority is sustenance, but be mindful of your impact where possible.
- Ethical Harvesting: In a survival scenario, only take what you need to survive. Avoid wasteful killing. If you catch more than you can immediately consume or preserve, consider releasing the excess, especially if they are breeding-age fish.
Mastering these primitive fishing techniques is a powerful addition to your survival toolkit, offering a reliable path to sustenance when all other options are exhausted. Practice these skills responsibly and ethically, and you’ll be better prepared for whatever challenges lie ahead.
Frequently Asked Questions (FAQ)
Q: How often should I check my primitive fish trap?
A: In a survival situation, check your traps as frequently as possible, ideally every 2-4 hours during daylight, and at least once in the morning. This prevents spoilage, reduces the chance of predators stealing your fish, and allows you to re-bait or adjust the trap as needed.
Q: Can I use these traps in saltwater?
A: Yes, the principles of weirs and funnel traps can be adapted for saltwater environments. However, saltwater fish species, tidal currents, and material availability will differ. For weirs, consider tidal flats or estuaries. For basket traps, ensure materials are robust enough for saltwater and stronger currents. Bait selection will also need to be adjusted for marine species.
Q: What’s the best bait for a primitive fish trap?
A: The “best” bait is often what’s naturally available and what local fish species are accustomed to eating. Generally, strong-smelling baits are most effective. Good options include earthworms, grubs, crushed insects, small pieces of other fish (especially their guts), crushed berries, or strong-smelling aquatic plants. The goal is to create a scent trail that lures fish into the trap.
Q: How can I make my woven basket trap more durable?
A: To increase durability, use strong, rot-resistant saplings and vines. Soaking materials before weaving makes them more pliable. Weave tightly and consistently. After construction, you can rub mud or clay into the weave to fill gaps and add a protective layer. Some traditional methods involve smoking the finished trap over a low fire to harden the wood and make it more resistant to decay.