
How to Build a DIY Solar Still for Emergency Water Purification: Ground, Box, and Pit Designs
In a survival scenario, access to clean, potable water is paramount. While many methods exist for water purification, a solar still offers a unique, passive, and highly effective solution, especially when fuel or chemical purifiers are scarce. Understanding how to build a solar still can be a life-saving skill, transforming brackish, contaminated, or even saltwater into safe drinking water using nothing but the sun’s energy. This comprehensive guide will walk you through the principles of solar distillation and provide detailed instructions for constructing various types of DIY solar stills, from improvised ground pits to more permanent box designs.
Related TacticalProof reading: How to Set Up Meshtastic for Off-Grid Communication: A Prepper’s Complete Guide | How to Build a Faraday Cage from a Trash Can: Step-by-Step EMP Protection | How to Make Char Cloth for Fire Starting: A Step-by-Step Prepper’s Guide
What Is a Solar Still and How Does It Work (Evaporation and Condensation Basics)
At its core, a solar still is a device that mimics the Earth’s natural hydrological cycle on a micro-scale. It leverages the sun’s energy to heat contaminated water, causing it to evaporate, leaving impurities behind. This process is known as distillation, and it’s one of the most reliable methods for purifying water, capable of removing bacteria, viruses, heavy metals, salts, and most chemical contaminants.
The Science Behind Solar Distillation:
- Evaporation: The sun’s rays penetrate a transparent cover (like plastic sheeting or glass) and heat the water source inside the still. As the water temperature rises, it turns into water vapor (steam). This vapor is pure H₂O, leaving behind salts, pathogens, and other dissolved solids.
- Condensation: The water vapor rises and comes into contact with the cooler inner surface of the transparent cover. As it cools, the vapor condenses back into liquid water droplets.
- Collection: These pure water droplets, now free of contaminants, trickle down the sloped inner surface of the cover and are collected in a clean container placed at the lowest point of the still.
This simple yet ingenious process makes a solar water distiller an invaluable tool for emergency water purification, providing a sustainable source of clean drinking water in diverse environments.
Ground Pit Solar Still: Materials, Digging, and Setup for Wilderness Survival
The ground pit solar still, often referred to as a survival still, is the most basic and easily improvised design, making it ideal for wilderness survival situations where resources are limited. It requires minimal materials and can be constructed with common items found or carried in a bug-out bag.
Materials Needed:
- Plastic Sheeting: A clear sheet of plastic (e.g., tarp, heavy-duty trash bag, painter’s plastic, even a large clear poncho). The larger the sheet, the more surface area for condensation.
- Collection Container: A clean cup, bowl, canteen cup, or any watertight vessel to collect the distilled water.
- Digging Tool: A shovel, trowel, or even a sturdy stick/rock for digging.
- Weight: A small rock or pebble to create a drip point in the center of the plastic sheet.
- Optional: A drinking tube (straw, flexible tubing) to extract water without disturbing the still.
- Water Source (Optional but Recommended): Green vegetation, urine, or brackish water placed in the pit can significantly increase output.
Step-by-Step Setup:
- Choose Your Site: Select a sunny, open area that receives direct sunlight for most of the day. Avoid shaded areas. Ensure the ground is relatively level or has a slight slope towards your collection point.
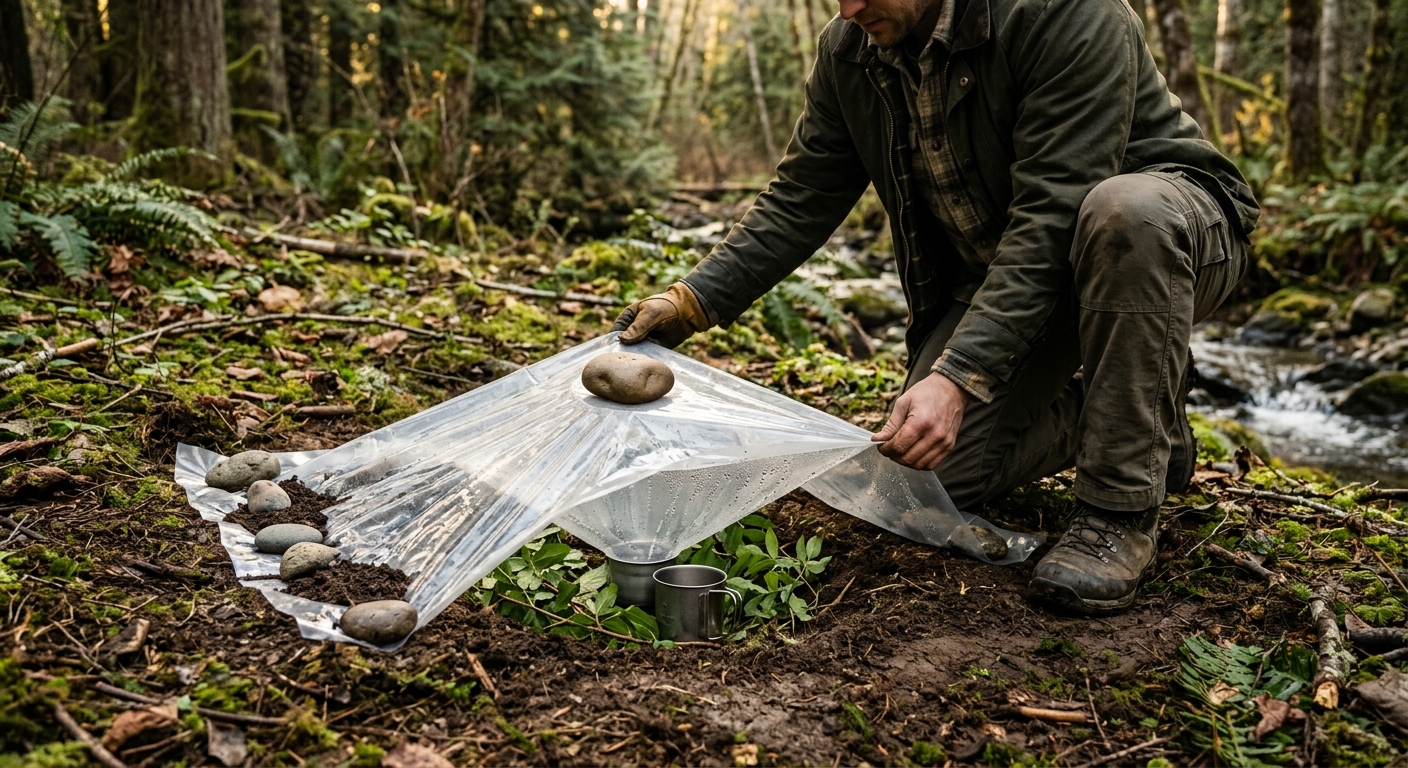
- Dig the Pit: Dig a bowl-shaped or conical pit in the ground, approximately 3 feet (1 meter) in diameter and 1.5 to 2 feet (45-60 cm) deep. The sides should slope gently inward.
- Place the Collection Container: Center your clean collection container at the very bottom of the pit. Ensure it’s stable and won’t tip over.
- Add Water Source (Optional): If you have green vegetation (non-poisonous leaves, grass), place a generous amount around the collection container, but not inside it. The moisture from the plants will evaporate and contribute to the water yield. You can also pour brackish water or urine into the pit around the container (again, not into the container itself).
- Cover with Plastic Sheeting: Carefully lay the plastic sheeting over the entire pit, ensuring it covers the edges of the pit completely.
- Secure the Edges: Anchor the edges of the plastic sheet with rocks, soil, or logs to create an airtight seal. This prevents water vapor from escaping.
- Create the Drip Point: Place a small rock or pebble directly over the center of the collection container, on top of the plastic sheeting. This will create a downward sag, forming a funnel for the condensed water to drip into your container.
- Insert Drinking Tube (Optional): If using a drinking tube, carefully thread one end under the plastic and into the collection container, securing the other end outside the still for easy access. Seal any gaps around the tube with soil.
Safety Warning: Never use a ground still over contaminated soil (e.g., near chemical spills, industrial waste). While distillation purifies water, it cannot remove all volatile organic compounds that might evaporate from contaminated soil. Always choose a clean, natural site.
Allow several hours for the still to begin producing water. Output will be slow but steady. Check the collection container periodically, especially in the morning after a full night of condensation.
Box-Style Solar Still: Building a Permanent Unit for Your Homestead
For a more permanent and efficient solution, especially for a homestead or long-term survival cache, a box-style solar still offers superior performance and durability compared to its ground-pit counterpart. This DIY solar still design is essentially a miniature greenhouse that maximizes solar gain and condensation.
Materials Needed:
- Wooden Frame: Lumber (e.g., 2x4s, 1x4s) for the base and sides. Plywood for the bottom.
- Transparent Cover: A pane of glass (e.g., old window pane) or clear polycarbonate/acrylic sheet. Glass is heavier but more durable and scratch-resistant.
- Dark Liner: Black pond liner, heavy-duty black plastic sheeting, or painted metal sheet for the evaporation basin. This absorbs maximum solar heat.
- Collection Trough/Pipe: A small gutter, PVC pipe cut lengthwise, or a metal channel to collect distilled water.
- Sealant: Silicone caulk, weatherstripping, or rubber gaskets to create airtight seals.
- Fasteners: Screws, nails, hinges (for an access lid).
- Water Outlet: A small spigot or tube for draining collected water.
- Insulation (Optional): Styrofoam or rigid foam insulation for the sides and bottom to improve efficiency.
Step-by-Step Construction:
- Build the Base Box: Construct a sturdy wooden box. A common size might be 2 feet wide by 4 feet long (60 cm x 120 cm) and 6-12 inches (15-30 cm) deep. The bottom should be solid plywood.
- Create a Sloped Top: The transparent cover needs to be sloped to allow condensed water to run down. Design the box so one end is higher than the other (e.g., 12 inches high at one end, 6 inches at the other) to create a slope of at least 10-15 degrees.
- Install the Dark Liner: Line the bottom of the box with your black material. Ensure it’s watertight and sealed at the edges. This is your evaporation basin.
- Position the Collection Trough: Place your collection trough along the lower inside edge of the box, directly beneath where the sloped cover will meet the side. Ensure it’s slightly angled towards a drain hole.
- Add Water Outlet: Drill a small hole at the lowest point of the collection trough and install a small spigot or a tube that extends outside the box for easy water retrieval. Seal it thoroughly.
- Install the Transparent Cover: Secure your glass or polycarbonate sheet to the top of the box, ensuring it forms a tight, airtight seal with the wooden frame. Use silicone caulk or weatherstripping around all edges. The cover should be removable for cleaning and adding water, or you can design an access lid.
- Insulate (Optional): If desired, add insulation to the exterior sides and bottom of the box to minimize heat loss and improve efficiency, especially in cooler climates.
- Test for Leaks: Before relying on it, add some water to the evaporation basin and let it sit. Check for any leaks in the liner or around the water outlet.
Maintenance Tips: Regularly clean the inside of the transparent cover to remove any dust or mineral buildup that could reduce sunlight penetration. Periodically clean the evaporation basin to remove accumulated sediment or salt residue.
Coastal and Saltwater Solar Still Adaptations for Desalination
One of the most remarkable capabilities of a solar still is its ability to desalinate saltwater, making it an invaluable tool for coastal survival or maritime emergencies. The distillation process inherently separates pure water from dissolved salts, leaving the salt behind in the evaporation basin.
Key Considerations for Saltwater Stills:
- Location: For ground stills, dig your pit close to the high-tide line, but above it, to access brackish groundwater or easily transport seawater. For box stills, place them on stable ground near the coast.
- Increased Evaporation Surface: Saltwater generally has a higher boiling point and specific heat capacity than fresh water, meaning it requires more energy to evaporate. Consider building a larger still or multiple stills to compensate for potentially lower per-unit output compared to freshwater sources.
- Regular Cleaning: Salt will accumulate as a crust in the evaporation basin. This residue can reduce the still’s efficiency by reflecting sunlight and insulating the remaining water. Regularly clean out the salt buildup from your ground pit or box still. For box stills, this means designing an easily accessible basin.
- No Direct Contact: Ensure that the saltwater never comes into direct contact with your collection container or the distilled water. The design must maintain a complete separation.
- Pre-filtering (Optional): While not strictly necessary for purification, pre-filtering saltwater through sand or cloth can remove larger debris, which might make cleaning the still easier.
A well-constructed solar still can provide a continuous supply of fresh drinking water from the ocean, a critical advantage in scenarios where other freshwater sources are unavailable or contaminated.
Realistic Output Expectations: How Much Water You Can Actually Produce Per Day
While a solar still is a reliable method for emergency water purification, it’s crucial to have realistic expectations about its output. It’s not a high-volume producer, especially the improvised ground pit designs. The amount of water a solar still can produce per day varies significantly based on several factors:
Factors Influencing Output:
- Size of the Still: Larger evaporation and condensation surfaces yield more water. A 3-foot diameter ground still will produce less than a 2×4 foot box still.
- Sunlight Intensity: Direct, strong sunlight for extended periods is critical. Cloudy days, partial shade, or short winter days will drastically reduce output.
- Ambient Temperature: Higher air temperatures increase the rate of evaporation.
- Humidity: Lower humidity allows for more efficient evaporation. In very humid environments, the air is already saturated with moisture, slowing down the process.
- Water Source Temperature: Warmer source water (e.g., from a shallow pond heated by the sun) will evaporate faster.
- Design Efficiency: Well-sealed stills with good insulation and optimal angles for condensation will perform better.
- Amount of Source Water/Vegetation: A continuous supply of water or moist vegetation in the still’s basin will maintain production.
Typical Output Ranges:
- Ground Pit Still: Expect anywhere from 0.5 to 2 liters (1 to 4 pints) per 24-hour period under good conditions. In less ideal conditions, it might be as little as a few hundred milliliters.
- Box-Style Still: A well-built box still (e.g., 2×4 feet) can produce 2 to 4 liters (0.5 to 1 gallon) per day, and some larger, more advanced designs can exceed this.
It’s important to understand that a single solar still is unlikely to meet the daily water needs of multiple people. An adult typically needs at least 2-3 liters of water per day for basic hydration, more if physically active or in hot climates. Therefore, consider building multiple stills or combining this method with other purification techniques to ensure adequate water supply.
Think of solar stills as a reliable, passive, and continuous source of supplementary water, rather than a primary high-volume producer, especially in a survival context.
Combining Solar Stills With Other Purification Methods for Redundancy
In any survival or preparedness plan, redundancy is key, especially when it comes to life-sustaining resources like water. While a solar still is an excellent tool for emergency water purification, relying solely on one method can be risky. The most robust water strategy involves a layered approach, combining solar distillation with other purification techniques.
Why Combine Methods?
- Varying Conditions: Solar stills depend on sunlight. On cloudy days, at night, or in heavily forested areas, their output will be minimal or non-existent. Other methods can fill these gaps.
- Increased Volume: As discussed, solar stills are not high-volume producers. Combining them with other methods can help meet the daily water needs for individuals or groups.
- Addressing Specific Contaminants: While distillation is highly effective, some volatile organic compounds (VOCs) can evaporate and re-condense with the water. Combining with activated carbon filtration can address these.
- Backup and Redundancy: Equipment can fail, supplies can run out, or conditions can change. Having multiple options ensures you’re never without a way to purify water.
Complementary Purification Methods:
- Boiling: The simplest and most effective method for killing biological contaminants (bacteria, viruses, protozoa). Bring water to a rolling boil for at least one minute (three minutes at altitudes above 6,500 feet / 2,000 meters). This is a great backup for solar stills, especially for water collected from rain or surface sources.
- Chemical Purification: Water purification tablets (iodine or chlorine dioxide) are lightweight and effective against most biological threats. They are excellent for on-the-go purification or as a quick solution when time is critical.
- Water Filters: Portable water filters (e.g., pump filters, straw filters, gravity filters) can remove bacteria, protozoa, and sometimes viruses, depending on their pore size. They are fast and convenient for filtering larger volumes of water.
- Activated Carbon Filtration: While not a primary purifier for biological threats, activated carbon is excellent at removing chemicals, pesticides, heavy metals, and improving taste and odor. Running distilled water through an activated carbon filter can address any lingering VOCs or improve palatability.
- UV Purification: Devices like UV pens use ultraviolet light to neutralize bacteria, viruses, and protozoa. They are fast and don’t require chemicals, but rely on batteries.
Practical Application: Imagine a scenario where you have a solar still running continuously, providing a slow but steady stream of pure water. Simultaneously, you might be collecting rainwater in a tarp, which you then boil or run through a filter. If you encounter a new water source while on the move, you use purification tablets. This multi-faceted approach ensures you’re prepared for any situation and can adapt your water purification strategy to the available resources and immediate needs.

FAQ: Your Questions About Solar Stills Answered
Q: Is the water from a solar still safe to drink?
A: Yes, water produced by a properly functioning solar still is considered highly pure and safe to drink. The distillation process effectively removes bacteria, viruses, protozoa, heavy metals, salts, and most chemical contaminants. However, it’s important to ensure the still is clean and that no contaminated water splashes into the collection container. Some volatile organic compounds (VOCs) with low boiling points might evaporate and re-condense, so for absolute certainty, running the distilled water through an activated carbon filter can be an added layer of safety.
Q: How long does it take for a solar still to produce water?
A: A solar still typically starts producing water within a few hours of being set up and exposed to direct sunlight. The rate of production will be slow initially and will increase as the internal temperature rises. For a full yield, you should allow at least 12-24 hours. Output is generally highest during the hottest parts of the day and can continue at a reduced rate overnight as temperatures drop and condensation continues.
Q: Can I use a solar still at night or on cloudy days?
A: Solar stills rely on direct sunlight for optimal performance. On cloudy days, production will be significantly reduced or even cease, as there isn’t enough solar energy to drive evaporation. At night, without the sun’s heat, evaporation stops. However, water that evaporated during the day may continue to condense overnight as the still cools, providing some additional yield in the morning. For consistent water supply during these times, it’s essential to have alternative purification methods.
Q: What if I don’t have plastic sheeting for a ground still?
A: While clear plastic sheeting is ideal, you can improvise. A large, clear plastic trash bag, a clear poncho, or even multiple layers of clear plastic wrap can work. The key is that it must be transparent to allow sunlight through and large enough to cover the pit and create a seal. If no plastic is available, a solar still is not feasible, and you would need to rely on other purification methods like boiling or filtration.
Q: Can a solar still remove all contaminants, including nuclear fallout or chemical agents?
A: Solar stills are highly effective against a wide range of contaminants. They can remove radioactive particles (which are solids) and many chemical agents that are non-volatile or have high boiling points. However, some volatile chemical agents or certain volatile organic compounds (VOCs) might evaporate and re-condense with the water. For extreme contaminants like nuclear fallout or specific chemical weapons, while distillation is one of the best methods, it’s prudent to combine it with activated carbon filtration and consider expert guidance on specific threats. Always prioritize safety and avoid highly contaminated sources if possible.