
How to Build a DIY Fog Net for Off-Grid Water Collection
Water is the most critical resource for survival, yet it’s often the most overlooked until a crisis hits. For those committed to true off-grid living or robust preparedness, diversifying water sources is paramount. While rain catchment and well drilling are common strategies, an often-underestimated method for atmospheric water harvesting is fog collection. Learning how to build a diy fog catcher can provide a surprisingly consistent and clean water supply, especially in regions prone to fog.
This comprehensive guide from TacticalProof.com will walk you through the science, materials, and step-by-step construction of your own fog net, empowering you to tap into an otherwise invisible resource for your long-term water independence.
Related TacticalProof reading: Can You Drink Morning Dew?
What Is Fog Harvesting and Why Preppers Should Care
Fog harvesting, also known as cloud water harvesting or atmospheric water harvesting, is the process of collecting water droplets from fog using large vertical nets. These nets intercept the tiny water particles suspended in the air, causing them to coalesce and drip into a collection trough below. While it might sound like a niche technology, communities in arid, fog-prone regions worldwide have relied on it for decades, demonstrating its viability as a sustainable water source.
For preppers and survivalists, the implications are significant:
- Water Independence: Reduces reliance on municipal water systems, which can fail during disasters or economic collapse.
- Renewable Resource: Fog is a naturally occurring phenomenon, making it a perpetually renewable water source in suitable climates.
- Low-Tech Solution: A fog net water collection system requires no electricity, complex machinery, or specialized skills beyond basic construction, making it ideal for off-grid scenarios.
- Complementary System: It can supplement rain catchment, especially during dry seasons when fog might still be present.
- Clean Water Potential: Fog water is often purer than surface water, requiring less treatment for potable use, though filtration is always recommended.
Imagine a scenario where your well pump fails, or a prolonged drought renders your rain barrels empty. A properly sited and constructed fog net could be the difference between dehydration and survival. It’s a testament to ingenuity and leveraging natural processes for self-sufficiency.
How Fog Nets Work: The Science of Droplet Capture
The principle behind a fog net is deceptively simple, yet rooted in physics. Fog consists of microscopic water droplets, typically 1 to 40 micrometers in diameter, suspended in the air. Unlike rain, these droplets are too small to fall as precipitation but are carried by wind.
When these fog-laden air currents encounter a fine mesh net, several things happen:
- Interception: The tiny water droplets, unable to pass through the mesh pores, collide with the fibers of the net.
- Coalescence: Upon impact, the droplets adhere to the mesh fibers. As more droplets collide and stick, they merge with existing droplets, growing larger due to surface tension.
- Gravity and Drainage: Once the accumulated water droplets become large enough and heavy enough to overcome the surface tension holding them to the mesh, gravity pulls them downwards. They run along the fibers, eventually dripping into a collection trough positioned at the bottom of the net.
The effectiveness of a fog net hinges on several factors:
- Mesh Material and Structure: The ideal mesh has a specific pore size and fiber thickness that maximizes droplet capture while minimizing air resistance. Too fine, and it blocks too much airflow; too coarse, and droplets pass through. Hydrophilic (water-attracting) materials can enhance collection.
- Wind Speed: Moderate wind speeds are crucial. Too little wind, and fog won’t effectively impact the net. Too much wind, and collected droplets can be blown off before they drain, or the net itself can be damaged.
- Fog Density: The more water droplets present in the air (denser fog), the greater the potential for collection.
- Net Orientation: The net must be oriented perpendicular to the prevailing fog-bearing winds to maximize exposure.
Understanding this science allows for informed material selection and optimal placement, ensuring your fog water collector diy project yields the best possible results.
Materials List: Mesh Types, Frames, and Collection Troughs
Building an effective fog net requires careful selection of materials that are durable, weather-resistant, and optimized for water capture. Here’s a breakdown of what you’ll need for a standard 1-square-meter (approximately 3.3 ft x 3.3 ft) experimental or small-scale fog catcher:
1. Mesh Material (The Heart of Your Fog Catcher)
This is the most critical component. Specialized fog-collecting mesh exists (e.g., Raschel mesh, often made of polypropylene), but for a DIY project, you can adapt more readily available materials.
- Recommended: Shade Cloth (30-35% density): This is often the best balance of availability, cost, and performance for DIY. Look for UV-stabilized, woven polyethylene shade cloth with a density around 30-35%. The weave creates small openings that effectively intercept droplets. Avoid solid tarps or very dense shade cloths.
- Alternative 1: Insect Screen (Fiberglass or Aluminum): Standard window screen can work, especially fiberglass, which is flexible and UV resistant. Aluminum is more rigid but can corrode over time. The pore size is generally larger than ideal, so efficiency might be lower than shade cloth.
- Alternative 2: Bird Netting (Fine Mesh): Some very fine bird netting (e.g., 1/4-inch or 1/2-inch mesh) can be adapted, but ensure the individual strands are thin enough not to create too much air resistance.
- What to Avoid: Anything too dense (like a tarp or heavy canvas) will block airflow and collect minimal water. Anything too open (like large-hole garden netting) will let most droplets pass through.
Quantity: For a 1m x 1m net, you’ll need a piece of mesh at least 1.2m x 1.2m to allow for securing to the frame.
2. Frame Materials (Support and Stability)
The frame holds the mesh taut and upright. It needs to be sturdy enough to withstand wind and UV exposure.
- Recommended: PVC Pipe (Schedule 40, 1-inch or 1.25-inch diameter): PVC is inexpensive, lightweight, easy to work with, and weather-resistant.
- Alternative 1: Treated Lumber (2x2s or 2x4s): More robust but heavier and requires more maintenance (sealing/painting).
- Alternative 2: Metal Conduit (EMT or Galvanized Steel): Very durable but heavier, more expensive, and requires specialized tools for cutting/bending.
Quantity for 1m x 1m PVC Frame:
- 4 x 1-meter (approx. 3.3 ft) lengths of PVC pipe for the main square.
- 2 x 1-meter (approx. 3.3 ft) lengths for vertical support legs (or longer if you want to elevate it significantly).
- 4 x 90-degree PVC elbows.
- 2 x PVC T-connectors (for attaching legs to the bottom bar).
- PVC cement and primer (for permanent joints).
3. Collection Trough (Water Channeling)
This sits at the bottom of the net to catch dripping water.
- Recommended: PVC Gutter or Half-Round Rain Gutter: Easy to install, lightweight, and designed for water collection.
- Alternative: Split PVC Pipe (4-inch or 6-inch diameter): Cut a length of large-diameter PVC pipe lengthwise to create a trough.
- Alternative: Repurposed Plastic Container: A long, narrow plastic container (e.g., a window planter box) can work if sealed properly.
Quantity: 1 x 1-meter (approx. 3.3 ft) length of gutter or pipe, with end caps and an outlet fitting.
4. Water Storage Container
A clean bucket, barrel, or cistern to store the collected water. Ensure it has a lid to prevent contamination and evaporation.
5. Fasteners and Miscellaneous
- UV-Resistant Zip Ties or Bungee Cords: For attaching the mesh to the frame.
- Drill and Bits: For making holes, if needed.
- Saw or Pipe Cutter: For cutting frame materials.
- Measuring Tape and Marker.
- Shovel/Post-hole Digger: If burying support legs.
- Rope/Guy Wires and Stakes: For added stability, especially in windy areas.
- Silicone Sealant: For sealing trough end caps and outlet.
- Fine Mesh Screen/Filter: To cover the trough outlet and prevent debris from entering your storage container.
Safety Tip: Always wear appropriate personal protective equipment (PPE) like safety glasses and gloves when cutting or assembling materials.
Step-by-Step Build: A 1-Square-Meter Fog Catcher
This guide focuses on building a simple, freestanding 1m x 1m PVC frame fog catcher. This size is manageable for a DIY project and effective for testing or supplementary water collection.
Tools You’ll Need:
- PVC pipe cutter or hacksaw
- Measuring tape
- Marker
- Drill with small bit (for drainage holes if needed)
- Gloves and safety glasses
- Rubber mallet (optional, for fitting PVC)
Construction Steps:
Step 1: Cut PVC Pipes for the Frame
Using your pipe cutter or hacksaw, cut the PVC pipes to the following lengths:
- 4 pieces: 1 meter (39.4 inches) each for the main square (top, bottom, and two sides).
- 2 pieces: 1 meter (39.4 inches) each for the vertical support legs. You can make these longer if you plan to elevate the net significantly, but 1m is a good starting point for a compact unit.
Ensure cuts are clean and straight for a snug fit.
Step 2: Assemble the Main Frame
- Take two 1-meter pipes and two 90-degree elbows. Apply PVC primer to the ends of the pipes and inside the elbows, then apply PVC cement. Quickly join them to form an ‘L’ shape. Repeat for the other two 1-meter pipes and two elbows.
- Now you have two ‘L’ shapes. Connect them with the remaining two 1-meter pipes and the final two 90-degree elbows to form a complete 1m x 1m square frame. Ensure all joints are firmly seated and allowed to cure according to cement instructions (usually 15-30 minutes before handling, 24 hours for full strength).
Step 3: Attach the Support Legs
- Locate the bottom horizontal bar of your square frame.
- Take your two PVC T-connectors. Apply primer and cement to the ends of the bottom bar and the T-connectors, then attach one T-connector to each end of the bottom bar, ensuring the third opening of the ‘T’ faces downwards.
- Apply primer and cement to one end of each 1-meter support leg and insert them into the downward-facing openings of the T-connectors.
- Allow all cemented joints to cure fully.
You now have a freestanding 1m x 1m frame with two legs.
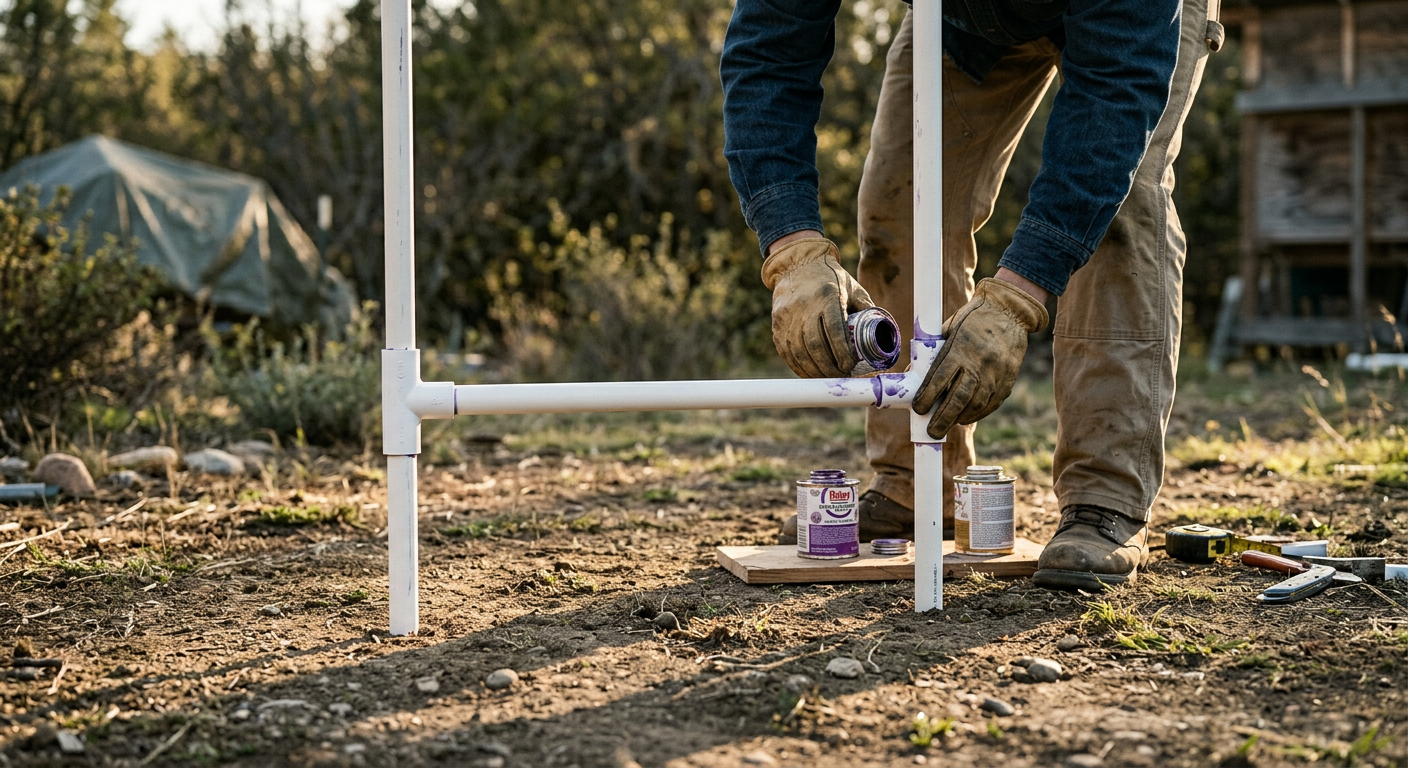
Step 4: Prepare and Attach the Collection Trough
- Take your 1-meter gutter or split PVC pipe. If using a split PVC pipe, ensure the edges are smooth to prevent cuts.
- Attach end caps to both ends of the trough using silicone sealant to ensure a watertight seal.
- Drill a small hole (e.g., 1/2-inch or 3/4-inch) near one end of the trough, on the bottom or side, to serve as an outlet. Insert a small hose barb fitting or a short piece of pipe and seal it with silicone.
- Position the trough directly beneath the bottom horizontal bar of your frame, between the two support legs. It should sit just below the mesh area to catch all drips.
- Secure the trough to the support legs or the bottom frame bar using zip ties, U-bolts, or custom brackets. Ensure it has a slight slope (about 1-2 degrees) towards the outlet end to facilitate drainage.
Step 5: Install the Mesh
- Lay your chosen mesh material (e.g., 30-35% shade cloth) flat.
- Center the 1m x 1m PVC frame over the mesh.
- Starting from the top, begin attaching the mesh to the frame using UV-resistant zip ties. Thread a zip tie through the mesh and around the PVC pipe, pulling it taut. Space zip ties every 6-8 inches (15-20 cm).
- Work your way down one side, then the other, pulling the mesh taut as you go. The goal is to create a flat, wrinkle-free surface.
- Finally, attach the bottom of the mesh to the bottom frame bar, ensuring it extends just into the collection trough or directly above it, allowing water to drip freely into the trough without wicking away.
- Trim any excess mesh.
Important: The mesh must be taut. Loose mesh will flap in the wind, reducing efficiency and potentially damaging the net.
Step 6: Connect to Storage
Connect a hose or pipe from the trough’s outlet to your chosen water storage container (e.g., a clean 5-gallon bucket or a larger barrel). Place a fine mesh screen or filter over the trough outlet to prevent leaves, insects, or debris from entering your storage.
Your diy fog catcher is now ready for deployment!
Optimizing Placement: Elevation, Wind Patterns, and Geography
Building the net is only half the battle; proper placement is crucial for maximizing your water yield. A poorly sited net will collect little to no water, regardless of its construction quality.
1. Understand Local Fog Patterns
- Observation is Key: Spend time observing when and where fog forms and moves in your area. Is it a morning phenomenon? Does it roll in from a specific direction?
- Topography: Fog often collects in valleys, low-lying areas, or on the windward slopes of hills and mountains. Coastal areas are prime locations due to sea fog.
- Prevailing Winds: Identify the direction from which fog-bearing winds typically blow. Your net must be oriented perpendicular to this direction. If winds shift, you might need multiple nets or a rotatable design.
2. Elevation Matters
Fog tends to be denser and more consistent at certain elevations. While ground-level fog exists, higher elevations (e.g., hilltops, ridges) often intercept cloud layers that are essentially high-altitude fog.
- Avoid Obstructions: Place your net away from trees, buildings, or other structures that could block airflow or create wind shadows.
- Higher is Often Better: If possible, site your net on a slight rise or elevated platform. Even a few feet can make a difference.
3. Wind Flow and Turbulence
- Laminar Flow: You want smooth, uninterrupted airflow through your net. Avoid areas with excessive turbulence, which can reduce collection efficiency and stress the net.
- Wind Tunnels: Natural wind tunnels (e.g., between two hills or buildings) can concentrate fog and increase wind speed, potentially boosting collection.
- Anchor Securely: Regardless of placement, high winds are a reality. Use guy wires, stakes, or heavy bases to anchor your fog catcher firmly. A collapsing net yields no water.
4. Geographical Considerations
- Coastal Regions: Often experience advection fog (sea fog) that rolls inland. These are excellent locations.
- Mountainous Areas: Orographic fog forms when moist air is forced upwards over mountains, cooling and condensing. Nets on windward slopes can be very effective.
- Inland Valleys: Radiation fog can form in valleys on clear, calm nights. While often less dense, it can still be a source.
Practical Tip: Before committing to a permanent installation, consider setting up a small test net in various locations on your property. Monitor its performance over several foggy periods to identify the optimal spot. A simple anemometer (wind speed meter) can also help you understand local wind dynamics.

Realistic Yield Expectations: How Much Water You’ll Actually Get
Managing expectations is crucial for any atmospheric water harvesting project. While a harvest water from fog system can be incredibly valuable, it’s not a magic faucet. The amount of water you collect will vary significantly based on several factors:
Factors Influencing Yield:
- Fog Density: The primary factor. Denser fog means more water droplets available for capture.
- Wind Speed: Optimal wind speeds are typically between 5-15 km/h (3-9 mph). Too low, and droplets don’t impact the net effectively; too high, and collected water can be blown off.
- Net Size: A larger net surface area will naturally collect more water. Our 1-square-meter net is a good starting point, but larger installations (e.g., 40-100 sq meters) are used for community projects.
- Mesh Type: Specialized fog mesh (e.g., Raschel mesh) can be more efficient than DIY alternatives, but even shade cloth can perform adequately.
- Duration of Fog Events: Longer periods of fog mean more collection time.
- Net Orientation and Placement: As discussed, optimal siting is critical.
Typical Yield Ranges:
For a 1-square-meter net, realistic yields can range from:
- Low-end: 0.5 to 2 liters per square meter per foggy day in moderately foggy conditions.
- High-end: 3 to 10+ liters per square meter per foggy day in very dense fog with optimal wind conditions.
For example, a 1m x 1m net in a good location might yield 2-5 liters (0.5-1.3 gallons) on a typical foggy day. This might not sound like much, but it’s enough for drinking and cooking for one person, or to supplement other sources. Over a week of consistent fog, this adds up.
Water Quality Considerations:
Fog water is generally considered cleaner than rainwater collected from roofs, as it hasn’t picked up contaminants from surfaces. However, it’s not sterile. It can still contain:
- Airborne Particulates: Dust, pollen, soot.
- Microorganisms: Bacteria, viruses (less common than in surface water but possible).
- Chemical Pollutants: Especially in industrial or urban areas.
Recommendation: Always filter fog water before consumption. A simple gravity filter (e.g., Sawyer filter, Berkey-type filter) is highly recommended for removing particulates and pathogens. For long-term storage, consider adding a small amount of bleach (e.g., 1/4 teaspoon per gallon) or using UV purification.
Combining Fog Collection With Rain Catchment for Year-Round Supply
The true strength of a diy fog catcher for preparedness lies in its ability to integrate with and complement other water collection methods. Relying on a single source is a vulnerability; diversifying creates resilience.
Synergistic Benefits:
- Seasonal Complement: In many regions, fog is more prevalent during cooler, drier seasons when rainfall is scarce. Rain catchment excels during wet seasons. Combining them provides a more consistent year-round supply.
- Increased Total Yield: Each system contributes to your overall water reserves, reducing the risk of running dry.
- Redundancy: If one system fails (e.g., a gutter breaks, a net tears), the other can still provide water.
- Optimized Storage: You can use a common storage system (cisterns, barrels) for both fog and rain water, simplifying management.
Integration Strategies:
- Shared Storage: Design your fog net’s collection trough to drain into the same primary storage tank as your rainwater harvesting system. Ensure the fog net’s inlet to the tank is screened to prevent debris.
- Independent but Linked: You could have separate initial collection barrels for fog and rain, then use a transfer pump or gravity to move water into a larger, central storage system. This allows for separate quality control if desired.
- Modular Expansion: Start with a small fog net and a basic rain barrel. As your needs grow or you gain experience, you can add more fog nets, expand your rain catchment area, or increase storage capacity.
Practical Example: Imagine a coastal property where winter brings frequent fog but less rain, and summer brings heavy but infrequent thunderstorms. A fog net provides a steady trickle during winter, while a robust rain catchment system fills tanks during summer downpours. Together, they ensure a more stable water supply throughout the year.
Remember, preparedness is about layers of defense. A fog water collector diy project adds a vital layer to your water security strategy, making your off-grid setup more robust and resilient against environmental fluctuations and unforeseen challenges.
Frequently Asked Questions About DIY Fog Catchers
Q: How much does it cost to build a DIY fog net?
A: The cost for a 1-square-meter DIY fog net can range from $50 to $150, depending on the materials chosen. PVC pipe and shade cloth are generally inexpensive, while specialized mesh or metal frames would increase the cost. This estimate doesn’t include the cost of a large storage container, which you might already have or can acquire separately.
Q: Is fog water safe to drink directly?
A: While fog water is often cleaner than surface water, it’s not sterile. It can contain airborne dust, pollen, and potentially microorganisms. For potable use, it is highly recommended to filter fog water through a reliable water filter (e.g., a ceramic or activated carbon filter) and consider purification methods like boiling or UV treatment, especially if you are unsure of the air quality in your area.
Q: How durable is a DIY fog net, especially in strong winds?
A: The durability depends heavily on the frame material and how securely it’s anchored. A PVC frame, while lightweight, can be susceptible to strong winds if not properly braced with guy wires and stakes. Metal or treated lumber frames offer more rigidity. UV-resistant mesh and zip ties are crucial for longevity. Regular inspection and maintenance are essential to ensure the net withstands weather conditions.
Q: Can I build a larger fog net for more water?
A: Yes, larger fog nets are common in commercial and community projects. However, scaling up a DIY design requires careful consideration of structural integrity. A larger net will experience significantly more wind load, necessitating a much stronger frame, more robust anchoring, and potentially a modular design. For DIY, it’s often better to build several smaller, well-placed nets rather than one massive, potentially unstable one.
Q: What maintenance does a fog net require?
A: Maintenance is relatively low. Regularly check the mesh for tears or debris (leaves, bird droppings) that could block airflow or contaminate water. Ensure the collection trough is clear and draining properly. Inspect frame connections and anchors for wear or looseness, especially after strong winds. Periodically clean the mesh with a gentle rinse to remove accumulated dust or algae, which can reduce efficiency.